Display Note : Re-flashing a display requires a reprogramming adaptor.
A display must NOT be connected to a controller for reflashing - attempting this may damage the display and/or controller!
Warnings - Read and understand!
|
 Reflashing should NOT be considered a trivial operation!
It's possible to make your device non-function, requiring it to be returned to us for low-level reflashing (ie. factory reset at the factory - we charge for this service!).
- Connect only ONE device at a time when reflashing (ie. don't leave a display connected to a controller you're reflashing!
- Never try rescue reflashing as a first course of action - always try a normal reflash first,
and if this doesn't work then ask why before blindly trying a rescue reflash.
- The biggest problem with reflashing is connecting to a PC first - if you've never used WButil before then the COM connection will be your first hurdle.
Your PC's COM port must work flawlessly before any reflash can be attempted.
- Always make sure you reflash with the correct .HXF file as the wrong file will crash your device, possibly permanently.
- Do you really need to reflash? What are you trying to fix? Is there another way?
- Be aware there is a Catch-22 - if the EE memory's baud rate "variable" becomes corrupt then it's possible the controller must be returned for repair!
- Don't panic - unless you've broken one of the above rules!
|
Basic Operations Overview
An encrypted ASCII/BIN .HXF file is read, converted to raw binary data and sent to the device to be re-programmed.
This is a two step process where code and/or data is programmed.
Normally EE memory is what is corrupted but there is a close relationship between the two parts,
and despite having the option of flashing each individually, normally both should be reflashed.
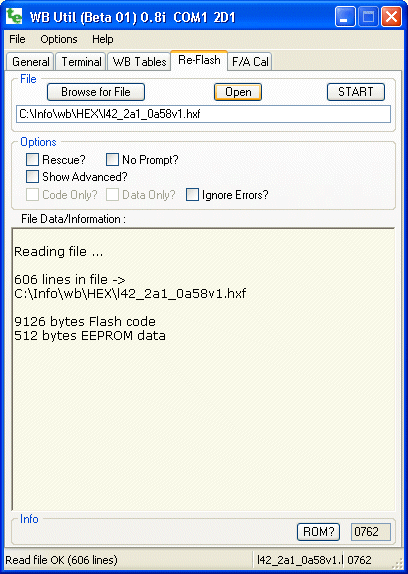
The screen shows a Browse for File ... button to select the .HXF file
containing both the code and the data.
The file will be automatically opened and checked for errors.
Errors, and file statistics, are shown in the File Data/Information area.
The screen shows the HXF file contains 606 lines of text that generated a
code size of 9,126 bytes and EEPROM (data) size of 512 bytes.
The Open button simply re-reads and displays statistics for the currently selected file.
The following flash options can be selected :
- Rescue? - This is not normally required unless you are reflashing because of a hardware
problem that has corrupted the controller's main code.
Alternatively, it must be used when upgrading from rev 0021 controller firmware (this code was released in 2004!).
Note that Rescue mode also requires that the unit be opened and a temporary jumper
is inserted while the re-flash is in progress (more info below). So, forget this option unless absolutely required!
- No Prompt? - Skips some informative messages. This is useful for batch programming
where all that needs to be done is hit the Enter key to program the (next) device.
- Show Advanced? - The advanced options, that have some element of risk associated with their
use, become active, including ...
- Code Only? - In certain circumstances it may be desirable to re-flash just the code
(for example, the data has been set up with tables that you want to retain).
Normally however code changes require different EE data and you should not check this option unless advised to.
- Data Only? - The data (or EE) memory may become corrupted (this can occur in electrically
noisy environments). This is a quick way to reset the EE memory.
As noted, it's important that EE memory does not get out of sync with the code memory as strange behaviour
can result.
- Ignore Errors? - Some non-fatal errors are ignored or are simply notified and skipped over.
Of course it's possible to do things that you shouldn't, but sometimes that's the only way.
|
 Re-Flash Programming : A Controller or Display can be updated with the latest firmware


