Calibrate Basics
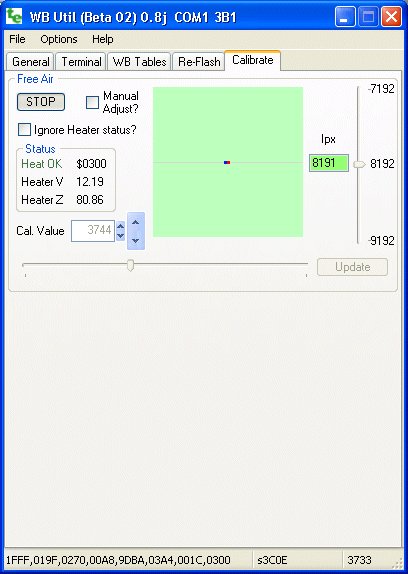
This shows the complete Calibrate screen. The top half is dedicated to free-air calibration.
Note that many newer controllers have an Auto-Calibrate function that works without having a PC attached.
 The Start button starts the calibration process.
We suggest you do not check the Manual Adjust? but this is available
in the event you have problems with the automatic process.
Manual calibration involves moving the horizontal slider and/or changing the Cal. Value field directly.
In normal operation the Cal. Value field is the currently set calibration value
written (temporarily) to the controller.
The Ipx value (shown as 8191 in the right green box) is the free-air Ipx value returned from the controller.
The aim is to get the Ipx value to the desired 8192 value
and then press the Update button to save the Cal Value to controller memory.
The right part of the screen shows the Ipx value on a slider.
The Ipx value box changes colour from bright green at calibration through yellow and to red when the calibration is right off.
You must STOP the calibration process to Update and save the current Cal. Value.
If you don't press Update then the old value will be restored the next time you switch your controller on.
If you change to another tab during calibration then auto-cal will be automatically stopped.
The Status area shows a number of different status items returned from the controller in the calibrate frame.
These include firmware status (shown decoded and in raw HEX format), heater voltage, and heater impedance.
The Ignore Heater staus? check box is used for earlier firmeware version (notably for 2A0) that had a
different calibrate frame that did not include heater status.
It will be automatically set for firmare revisions of 48 or lower, and of course, the heater status items shown will then not be relevant.
Conditions Required
The sensor must be sitting in free-air, heated for at least 2 minutes, and for best results
the battery voltage and surrounding air should not change -
do not blow on the sensor as your breath has lots of CO2 which changes the calibration of the sensor.
The actual calibration takes 10 to 30 seconds to perform and if it takes longer,
or shows some kind of an error, then try it again.
If you are too lazy to take your sensor out of the exhaust to re-calibrate it,
then forget any kind of accuracy as stale exhaust gas can hang around for days
and this can be enough to cause very inaccurate calibrations.
The LSU 4.0 (the 6066) and 4.2 sensors (7200 or 7057) have different calibration values.
The 7200/7057 will normally be somewhere between 3200 and 3800 with the 6066 being around 200 smaller
(LSU 4.0 requires a larger pump current compared to the LSU 4.2).
For most controllers a calibration value of more than 5000 or less than 2000 indicates some kind of error,
either with the controller, the cable, the sensor, or perhaps the calibration software (!).
If you change from one sensor type to another then you must re-calibrate the sensor/controller.
Changing sensors may require a different cable connector.
Changing to other sensors may also require a firmware and jumper change.
Note also that most Tech Edge controllers (except 2J) will remain reasonably well calibrated when the sensor is changed.
The 2J controllers support just one sensor type (LSU 4.0/4.2) and uses simpler drive circuitry.
2J controllers have very different calibration values in the 8000 range.
Calibration (either Auto-Cal or software cal) must be performed whenever the sensor is changed on 2J models.
Graphic Display
The software talks to the wideband controller and adjusts the controller's operating parameters.
The example shown has produced an intermediate Cal value of 3744 at an Ipx of 8191.
The light green graphics area shows a fixed red dot at the centre, and a moving blue dot.
The blue dot moves vertically to show how far it is from the desired 8192 Ipx value (so it follows the right slider).
It moves horizontally to show the current Cal. Value in relation to the Starting Cal. Value.
At calibration the blue dot should be in the centre of the screen horizontally (ie. either left or right of the red dot).
Operation of the graphics screen can be better understood if you gently blow on the sensor -
the CO2 in your breath will change the oxygen concentration and the blue dot will move around the screen.
If you use the controller's in-built Auto-Cal button
(many newer controllers have this facility - the original 2Ax units did not),
then you should refer to the documentation for any special conditions or setup that may be necessary.
The controller's LED usually shows the progress of the inbuilt Auto-Cal operation as a short sequence of quick flashes
that terminates in a longer cycle of flashes as the updated Cal value is written to EE memory.
|  Free-Air Calibration : A Controller can be semi-automatically, or manually, free-air calibrated with this utility.
