|
This document focuses on using WinLog
(and the older TEWBlog) to record thermocouple data.
This should be easy but can be difficult because Tech Edge made some decisions
a long time ago that treated thermocouple channels differently to user (0 to 5 Volt) channels.
|
This document is both theory and practise. If you don't want to know why, but just want to do it, then skip the first couple of headings and go to TEWBlog setup or WinLog setup.
When we (Tech Edge) designed our first digital wideband controller (the 2A0), as well as basic wideband functionality, we added:
Subsequent controllers were based on this design and, to make life easier for software developers who used the raw data from our controllers, these inherited the same (flawed) initial decision.
| Possible 0-5V & TC channel setup |
Amplification | Data Width | ||
| x 1 | x 101 | 10 b | 13 b | |
| Native TC channel | |
|
||
| Native 0-5V channel | |
|
||
| TC channel as 0-5V | |
|
||
| 0-5V channel as TC | |
|
||
The problem was that we treated thermocouple (TC) data (which we used in its raw 10 bit format) and analogue (0-5V) data (which we scaled by 8 times to give 13 bits) differently.
This was fine when we had just one model, But then we added models with the ability to make an analog channel into a thermocouple channel, and vice versa. The different software scaling and the different hardware amplification factors means there were four possibilities that are shown in the table at right.
Lets see if we can solve these potential problems. Although Winlog (discussed below) is newer, some people still prefer to use TEWBlog.

Remember that TEWBlog is Justin Luton's (ie. DevTechnics) software. We only indirectly support it (and receive no remuneration). We do provide feedback to Justin. Remember also that Winlog is newer, and possibly harder to set up, but solves some of TEWBlog's problems that will become apparent.
This section describes how to set up TEWBlog to:
) If you don't have TEWBlog installed, or if you want to see what we
are discussing below without first installing it, click on the image at left, or
here
for a popup image of the main TEWBlog screen.
If you don't have TEWBlog installed, or if you want to see what we
are discussing below without first installing it, click on the image at left, or
here
for a popup image of the main TEWBlog screen.
Details: Let's assume you have downloaded the latest TEWBlog (here we have used vers. 2.1e dated 2006), and have set it up as shown at right. Note the following, that are not very well described in the TEWBlog user manual.
TEWBlog with Four (or more) TCs)
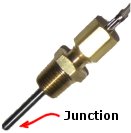
We are going to show you how to get a fourth working thermocouple channel on either 3B1 or 3H1 (see later for 3A/E and others). These controllers have four differential channels TC1, TC2, TC3 & USR3 which are very suitable for thermocouples. We will set up USR3 to be TC4 because USR3 can be easily and independently set to multiply its input by the x101 factor required for correct thermocouple support. Hardware setup: the image at left how the 8 way DIP switch inside the 3H1 case should be set for USR3 to become TC4 (the 3B1 is similar and is shown here). The DIP switch is set for x101 amplification (switches 1 and 2 in the ON position). The x101 factor is required as noted in the technical section above. Click on the image (or here) to see the default position of the switches as shipped (USR3 by default is a 0-5 Volt input with a x1 amplification factor).
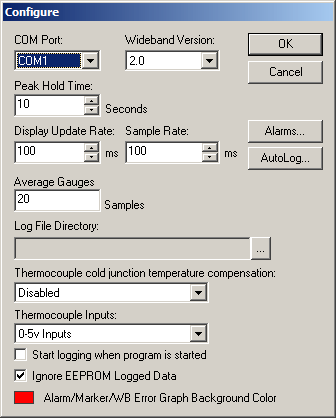
Configure Setup: Now we have the hardware set correctly, we have to set up the software.
Refer to the TEWBlog Configure dialogue box above right.
It shows we have set the Thermocouple Inputs to be 0-5v Inputs. We do this because, as we will see, we can then
use the same tables for TC and for USR inputs. We have also Disabled CJC (Cold Junction Compensation).
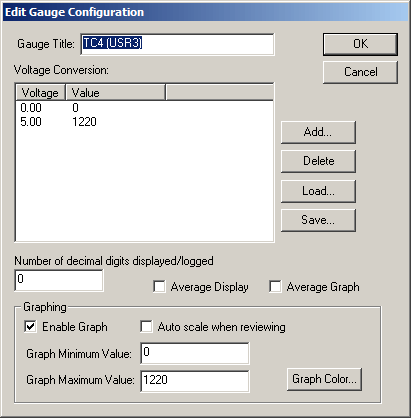
Each Channel's Setup: Now we have to set up each of the existing thermocouple channels TC1 to TC3 as well as the new TC4 (ie. USR3) channel. USR3/TC4: The image, immediate right, shows the setup for USR3 (we will rename it to be TC4). To get to this screen from TEWBlog's main screen, click on the User 3 display, this is in the centre column & is the third image from top (image). Here's what we have done:
The setup for TC1 to TC3 is different to the default setup for these channels. It's possible to load a new configuration from a file using the [Load...] button. The contents of the file we need to load is: TC channels as 0-5v inputs Version: 1.0 Gauge Name: TCx Graph Min: 0 Graph Max: 1220 Floating Point: 0 Gauge Data: 0.00, 0 0.63, 1230 Here's the above file tc1to3-set0to5-asTC.txt, or simply copy and paste the above text into your own file. Now, to customise each of the files for TC1 to TC3, simply [Load...] the file for each channel and change the Gauge Title: as appropriate. Go here to see what the result is. A little explanation is required here because of some peculiarities of TEWBlog. We really wanted to enter the second data point as 0.62494 Volts with Display 1220. The theoretical value 0.62494 Volts is the 49.5 mVolts from the thermocouple at 1220 °C times the 101 multiplication factor divided by the scaling from 13 bits to 10 bits (÷ 8) so 0.0495 * 101 ÷ 8 = 0.62494 Volts ~= 0.625V). The point 0.63 Volts at 1230 °C point is the closest we could get because when we [Save...] and re[Load...] the configuration file, the 0.62494 value gets rounded up to 0.63, so we adjusted 1220 (by 1220*.630/.62494) to give a precise 1230. Some Explanations: To get four thermocouples working with TEWBlog, we had to make some simplifications that now require explanation. We disabled CJC on TC1 to TC3 so we could change USR3 to TC4. Disabling CJC only becomes an issue if your absolute thermocouple readings are very important or you are trying to measure low (below 250°C) temperatures accurately with a thermocouple.. The majority of users will be comparing one sensor's readings with another, so even if their absolute values are not spot on, the differences will tell you what's happening between sensors. If you're trying to read a relatively low temperature (say coolant temperature) with a k-type thermocouple then this is NOT the correct thermocouple type to use in this situation! Most water temperature sensors are thermistors (not thermocouples) that are connected to a regulated voltage source (5 Volts) via a resistor - quite different to what we're doing here! The reality is that the actual temperature the EGT sensor measures is very dependent on the sensors position in and down the exhaust tube. Small changes between the shape and flow of exhaust ports will often mean that the same sensor will not read exactly the same in different ports that otherwise seem to be set up the same way. |
TEWBlog TC calibration)
For some situations where thermocouples need to be as closely matched as possible, a further step can be done to calibrate each channel. Small differences occur between thermocouples because:
To both investigate and fix these issues, you can construct a circuit like the one at right (bigger), or for 3B1 here It simply produces a variable voltage (≈160 mVolt on orange wires) that is fed into each (+) pin of the differential inputs on a 3H1 unit. The 500Ω potentiometer (at left) allows the voltage to be varied from 0 to the useful maximum of 49.5 mV and above. Note that the 3H DIP switches are set for x101 gain and floating (differential) inputs. We have labelled TC1 and also USR3/TC4. Note also that all the (-) inputs are connected to GND (black wires) and the red wire comes from the 3H's convenient on-board 5 Volt regulator. The 3H is powered from a 12 Volt bench supply and is connected to a PC running TEWBlog. |

Lets assume we have the circuit described above, and we have set the DIP switches and TEWBlog's channels as described. You will almost certainly find that, at any one setting of the potentiometer, none of the temperatures will read the same. The image at right shows an example (we have dimmed the irrelevant USR1 and USR2 gauges). You can see there is a display variation from 969 to 987 - or a variation of 18°C. Here's what's happening:
|
)
Here's how we fix the OFFSET: First we must address situation 1 above (the offset voltage issue). With the pot we set the lowest of our four gauges to display a value of 50, then for each of the other three displays we subtract an offset. For example, our lowest display is TC3 (at 50 as shown), and the next smallest is TC4/USR3 (at 60). Click on the image or here to see what we changed. You can see that for the TC4/USR3 channel we [Add]ed an offset of -10 and decided it was not quite right so we [Add]ed -11 and we then [Delete]d the first -10 entry. We can do this, check the figures, and adjust until it's just right. So the idea is simple - we adjust the bigger numbers down by using a negative number of around the difference (or just a bit more). That will give us all the channels reading 50. Don't worry if they jump around a little, this is a real world situation where there's always a little measurement noise. Some perseverance will get all the gauges reading the same. |
)
Here's how we fix the GAIN: Now wind the pot so the smallest gauge shows about 1150. If everything is working properly (and you have followed everything correctly) the other three gauges should be reading close to 1150 too - perhaps up to 1175. When we did it we got the display shown at right. The highest reading gauge was TC1 reading 17 higher TC3. We follow much the same procedure as before to reduce the value shown on gauge TC1. Click on the image or here to see what we changed. You can see for TC1 we tried offset of -17 (1230-17 = 1213) and then tried the larger offset -18 by entering 1212 (and [Delete]ing the 1213 entry). Just remember that for the TC1 to TC3 gauges, for gain adjustment, we modify the Voltage entry 0.63 (or rather we change the Value for this voltage). However, for TC4/USR3 the voltage entry we are changing is the 5.00 Volt entry as shown here. Remember that there is a scaling factor of 8 between the USR and the TC channels and that 0.625*8=5.00 and we use the 0.63 entry rather than 0.625 because TEWBlog truncates our voltage to two decimal places. |
Actual Software Setup - WinLogTo be completed (as at 18th Aug 2010). |

)
)