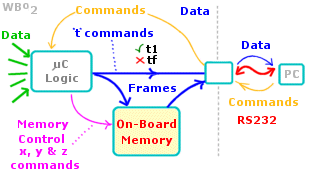
This page describes WBo2's integrated logging capability including specifications for the serial data frame used. Note : The 2A1 controller is used as an example below but most of the information presented relates directly to version 3 units and other version 2 units including the newer version 2Y model. |
Overview - Serial Logging & On-Board Memory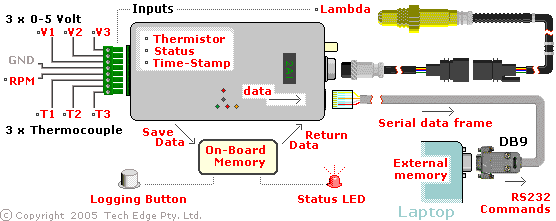
Serial Logging : The 2A1 WBo2 unit shown (other units are similar) has 9 sources of data it can log:
The green connector at the left end of the unit provides the physical connections to 7 of those external data inputs. A time-stamp, the device-status and the unit's internal temperature (thermistor) are also available. The collected data is formed into a serial data frame and sent out on one or more of the RS232 ports (RJ45 socket), the USB port (USB type-B socket), or the CAN bus (for models with that capability). A number of data frame types may be produced but the default frame is decode by logging software, or one of the intelligent displays (eg. LA1, LX1, or LD02, etc.). Any time the unit is powered it generates these data frames. The power-up frame type, and the frame repeat rate, may be changed (see below), but the display must be reprogrammed if the default frame type changes.
All newer controllers with on-board memory have 1 M byte that can store over 37,440 frames of 28 bytes each (the size of the default data frame). The default logging rate is 10 frames/second at 19,200 baud or 1,920 characters/sec so that 3,744 seconds (over 62 minutes) of data can be saved. At the maximum frame rate of around 50 frames/second the maximum storage drops to over 12 minutes. The logging rate can be reduced (by changing the delay between data frames) to enable days (or weeks) worth of data to be stored. Earlier models had just 32 k byte of on-board memory for about 115 seconds of storage, or just less than 2 minutes (at the default logging rate of 10 frames/sec). It typically takes less than 20 seconds to download the maximum data that can be stored on the smaller 32 k byte memory units. |
Logging Control - Button & Serial CommandsTwo ways to control on-board logging are possible :

Because there is only one button, and because we want to preserve existing data that may be stored in memory, a combination of short, medium, and long button presses commands the WBo2 on-board logger to enter one of three states - Logging OFF, Logging Enabled and Logging. Refer to diagram at right
To understand what the diagram means, here are the simple steps to using on-board logging. The normal power-up state for WBo2 is the logging OFF state :
|
|
Enabled |
On WBo2 units with on-board logging memory, the red LED, which normally shows wideband status, flashes according to a different pattern when on-board logging is enabled.
The status LED will flash this way even if RS232 commands (eg. from a display) enabled on-board logging. |
Logging |
|
It is important to differentiate between two classes of commands that control the data saved & generated by WBo2 :
|
Note that all commands mentioned below are simply ASCII text strings terminated with the CR (Carriage Return = 0x0D or decimal 13) character. The terminal tab of the wbUTIL program can be used to enter commands and to view results.
Even if the WBo2 unit does not have on-board logging memory, RS232 logging commands control the operation of the serial data frame allowing it to be stopped, started and its repeat rate changed. The data frame produced can be selected from among a number of preset types including a version 1.5 frame that is compatible with older WBo2 units. An option to produce an ASCII/Hex version of each frame, but without the CRC and frame header information, is available for debugging and human readable logging using software like HyperTerminal.
|
Command |
Action |
|---|---|
|
tn |
Trace command - stop/start/one-shot logging to serial port (and to on-board memory if on-board logging enabled).
|
|
s03xx
|
Set logging control byte to xx (hex) where xx bits are defined (default = bold) :
|
|
s04xx
|
Set the logging delay between frames to xx (hex) in units of 10 Sec. Minimum value is 1, maximum is 100 (0x64). |
* note : Combinations of the s03 command's xx bits produce the following modes
| s03e0 | 1v5 Binary mode, used for 1.5 logging. |
| s03e1 | 2v0 Binary Mode, (default mode, used by intelligent displays). |
| s0380 | 1v5 ASCII HEX Mode, as above but ASCII readable. |
| s0381 | 2v0 ASCII HEX Mode (Human readable version of above E1). |
| s0382 | CAL ASCII HEX Mode, produces calibration information. |
| s0384 | Status ASCII HEX Mode, PID and error status information. |
* note : In ASCII/Hex mode the frame header (2 bytes) and frame sequence counter byte are not transmitted, neither is the CRC (checksum). Data is transmitted as groups of two bytes, ie. as 4 Hex characters. This results in a clean human readable display for most frames as most displayed data is 16 bits long.
Refer to the WBo2 software page for more information on available utilities.
Note that the sxxyy commands (such as s03e0) are generic commands to set configuration byte xx to the value yy. They are often followed by the w command used to permanently save configuration memory.
Newer controllers with on-board logging memory contain 1 M Byte of Flash memory. Older controllers had just 32 k byte (32 times less) of EE memory. The details for 32 k memory is described after the 1 M byte section immediately below. Storage strategies change between the two sizes.
1 M byte Flash Memory : Data is stored in sectors of 4096 bytes (0x100) each. One sector is used for data management leaving 255 sectors for logged data (256 * 4,096 = 1,048,576 or 1 M). The memory is logically divided into logging sessions with a minimum size of one sector. Up to 255 sessions can be logged. Alternatively, a single session of 255 sectors is possible (37,302 frames of 28 bytes). The commands to support this scheme are :
|
Command |
Action |
|---|---|
|
xn |
Stop/Start logging of data to on-board memory.
|
|
y0040 |
This is a special case of the set logging pointer command and effectively clears all logging sessions
and can be used after all data has been downloaded to a PC.
It is equivalent to pressing the on-board logging button (from the logging OFF state) for more than 4 seconds.
The status LED will do about 10 very fast flashes to indicate the action.
|
|
znn
|
Dump data from on-board memory.
The first form dumps saved data from session with ID nn (assuming it is a valid session).
|
|
q |
Query on-board memory status.
The first form, without parameter, returns aabb where :
|
|
qnn
|
The second form, with parameter nn returns the byte length of session nn.
The length is a six digit hex number hhhhhh.
|
|
k
|
Read the memory type ID string.
A 4 digit hex string is returned
|

32 k byte EEPROM Memory is accessed as 512 pages of 64 bytes (0x40). The memory is addressed, using a logging pointer, in a linear fashion from 0x040 to 0x7FFF. Note that as the first 64 byte page (address 00 to 0x03F) in the EEPROM is reserved for working pointers, the smallest value for the logging pointer is therefore 0x040, and the maximum size of stored data is 511 * 64 = 32,704 bytes (1,168 frames of 28 bytes).
Data is saved in frame sized chunks (the green rectangles in the diagram). Each new log session simply appends new data to the previously recorded data. The logged data frame's time stamp will help show you where a log session's data starts and stops.
Logging occurs at the speed, and mode, specified in WBo2's configuration RAM locations 3 and 4 (see the previous "Software Control of Logging" section). Note: no compression is used for storing data and multiple formats may be saved. This also means the storage time can be easily calculated.
|
Command |
Action |
|---|---|
|
xn |
Stop/Start logging of data to on-board memory.
|
|
ywwww
|
Set logging pointer to wwww (eg. minimum y is 0x0040, maximum 0x7FFF).
Normally the y0040 command is used to clear logged data memory in preparation for a new recording session
and is equivalent to pressing the on-board logging button (from the logging OFF state) for more than 4 seconds.
|
|
z |
Dump logged data. This is from y = 0x0040 to the logging pointer's current value. The logging pointer is not reset by this command. |
This section lists a number of frame types that can be produced by (most) WBo2 controllers. It should be remembered that the frame types have evolved with the aim of backward compatibility but this has resulted in some strange values for some fields.
In the notes below, [low] and [high] byte groupings form 16 bit words (in Motorola format) with MSB first. User Input values represent voltages between 0 and 5.00 Volts and are 13 bits (in the range 0 to 8191). Thermocouple values are only 10 bits and (when the jumpers are set correctly) cover the range 0 to 0.0495 Volts (or 49.5 mV). This represents an amplification factor of 101 to the raw thermocouple values. Go here for more detail on thermocouples and thermistors.
The first 3 (bytes 1, 2 & 3) and last (CRC byte 12) bytes of all data frames are the same and allow the receiving computer to correctly synchronise with data and to check that data has not been corrupted.
The native mode for version 2 and newer units is the 2.0 mode frame format as described below.
2.0 Data Frame Format
1 - Frame Header byte 1 (0x5A)
3 - Frame Sequence counter
4 - Tick [high] (1 tick = 1/100 Second)
6 - λ-16 or Ipx(0), (or ADC) [high] byte
8 - Ipx(1) [high] (8192=F/A, 4096=Ipx[0])
10 - User 1 ADC [high] (V1 input)
16 - Thermocouple 1 ADC [high] (T1 Input)
22 - Thermistor ADC or Vss count [high]
24 - RPM count [high] byte
26 - Status/Error [high] byte 28 - CRC (1's comp. sum of above) |
The first 3 bytes (frame ID, & frame sequence counter) and last byte (CRC) are as described in the 1.5 frame below. Bytes 4 & 5 count relative time in Ticks - measured in 1/100 of a second (ie. 10 mSec/tick). The count goes from 0 to 65535 (unsigned) and will overflow in just under 11 minutes (10 minutes, 55 seconds & 35 mSec) and should be sufficient to act as a timebase for most logging tasks. Bytes 6 & 7 Originally Wblin DAC count, but in 2007 these two bytes were redefined to be Lambda-16 for all controllers except 3H1 where it is Ipx (0).
Bytes 8 & 9 is the (single channel) Ipx or Normalised Pump Current. For 3H1 it's the second channel Ipx or Ipx(1) - After a calibration factor has been applied to the raw pump current, the resulting normalised pump current Ipx has a free-air value of 8192 and a zero pump current value of 4096 (which is not quite the stoich point). A value of 0 represent the richest condition that can be sensed by the WB unit (less than AFR=10). Bytes 10 through 15 are the three 0 to 5.00 Volt user inputs U1, U2 & U3 (there's an additional user input available on version 2.0 compared to 1.5). Although the inputs are sampled at 10 bit accuracy, the result is multiplied by 8 giving 1024 steps (ie. 0, 8, 16 .. 8176, 8184). This ensure version 1.5 frame compatibility and allows for future hardware having increased measurement accuracy (up to 13 bit accuracy) Bytes 16 through 21 are the three thermocouple inputs T1, T2 & T3. They are sampled at 10 bit accuracy but are NOT multiplied by 8, and are therefore scaled differently to the 0-5 Volt input fields. Some models allow the thermocouple inputs to be converted to simple 0-5 Volt inputs (the internal thermocouple amplifier is set to have a gain of x1), but please note that this does NOT change the software scaling - these inputs still have 10 bit scaling. Go to the page on how the thermocouple inputs work, and other related topics for more information. Byte 22 & 23 represent either the thermistor (models with thermocouple inputs), or the Vss count (vehicle speed sensor) for 2J1 models.
Bytes 24 & 25 is the RPM count and has the same format as the 1.5 frame (ie. count 1 = 5 μSec) but with the additional feature of averaging two successive triggering events to cater for odd fire engines that may be triggered from the one coil. Bytes 26 & 27 Status/Error bytes see Error Codes section below. |
|
Bytes 1 & 2 are the fixed frame signature bytes of 0x5A, 0xA5 (ie. hex values). These value were chooses as they have alternating 0->1 bit patterns. byte 3 is the frame sequence counter and simply counts from 0 to 255 and then repeats, and allows the receiver to keep track of possible lost data frames. All these values are included in the CRC calculation. Bytes 4 and 5, the SVout ADC value, is compatible with the version 1.5 unit (and the 5301/LD01 displays). SVout is described in the DIY-WB 1.0/1.5 section as the Vout signal. The SVout value (ie. Vout) varies from a minimum rich value of 0x068E (=1678 decimal, so SVout is 5*1678/8192=1.02 Volts) to maximum lean (ie. free air) value of 0x199A (=6554 decimal, so SVout is 5*6554/8192=4.00 Volts). The Min and Max SVout values are clamped by the firmware. Bytes 6 through 9 are the two 0 to 5.00 Volt User Inputs U1, U2 (U3 is not returned) On the 1.5 unit these inputs are really a 10 bit value that is sampled rapidly 8 times and summed. On the 2.0 unit there is just one 10 bit sample for each channel, but the result is shifted 3 places to be compatible with the 1.5 data. (ie. there are 1024 steps - 0, 8, 16 .. 8176, 8184) for version 1.5 compatibility. Bytes 10 and 11, the RPM count measure how many 5 microsecond time periods are counted between successive positive pulse edges on the COIL or RPM Pulse input pins. As the frequency of the pulses increases (RPM goes up), the count goes down. For a four cylinder 4 stroke engine (that produces two spark events per revolution), at 6,000 RPM there are 100 revolutions per second and 200 spark events and therefore the COIL input will measure 5,000 microseconds between sparks, or an RPM count of 1,000 for bytes 10 and 11. Note that if the pulse rate is lower than 20 per second then the unit will "time out" and return an invalid count. |
1.5 Data Frame Format
1 - Frame Header byte 1 (0x5A)
3 - Frame Sequence counter
4 - SVout ADC [high]
6 - User 1 ADC [high] byte
8 - User 2 ADC [high] byte
10 - RPM count [high] byte 12 - CRC (1's comp. sum of above) |
Final CRC byte 12, when added to all the other bytes in the frame, and truncated to 8 bits, should result in the value 0xFF. If not then at least one bit in the frame has been zapped and the frame's data should not be trusted. As the sequence counter constantly changes, then the CRC value will also change.
Most WBo2 2.0+ models include a calibrate frame type designed to enable external software to free-air (F/A) calibrate the controller. If you have a newer controller that has a self-calibrate button (or one that can be added - eg the 2D0/2D1 models) then we recommend you use that method rather than the external software method. Extra status information is available from the calibrate frame type as described below. There is no equivalent version 1.5 frame type. There is no guarantee that this frame format will be supported in future wideband models (eg, 2J does not fully support this frame type, but works with the wbUTIL utility).
2.0 Calibrate Frame
1 - Frame Header byte 1 (0x5A) |
The first 3 bytes (frame ID, & frame sequence counter ) and last byte (CRC) are as described for the standard 2.x frame format. Bytes 4 & 5 Normalised Pump Current (Ipx) Bytes 6 & 7 is the xxxx field. Bytes 8 & 9 is the htr_vh or heater voltage value. Heater Voltage = htr_vh / 51.2 - this is a good diagnostic aid to ensure the controller is operating correctly. Bytes 10 & 11 is the htr_i or heater current value. Heater current = htr_i / 51.2 - this is a good diagnostic aid to ensure the controller is operating correctly. Bytes 12 & 13 is λ-16 (Lambda-16). For further info see the λ-16 link. Bytes 14 & 15 is a representation of the Heater Impedance. Bytes 16 & 17 is the opstate variable. Bytes 18 & 19 Status/Error bytes see Error Codes section below. Byte 20 - CRC (1's comp. sum of above) |
WBo2's hardware and software contains two PIDs (Proportional, Integral & Derivative) feedback controllers for both Lambda sensing and also precise heater temperature control. Each PID samples a signal from the Lambda sensor and in turn provides an output that in turn controls that signal :
Because both Ri and Vs are meaningless until the sensor has reached a minimum operating temperature, the two PIDs also operate in a startup mode. During startup the sensor is run in open loop mode where heater current is closely controlled to ensure the fastest warmup while remaining within the sensors operating envelope.
Feedback control relies on a measured signal being slightly different from the setpoint or target value. One measure of the PID's current status is how far away the controlled value is from this setpoint. In the case of the Vs/Ip feedback loop, the Vs setpoint is 450 mVolts, and for the Ri/PWM feedback loop the Ri setpoint is 80 ohms.
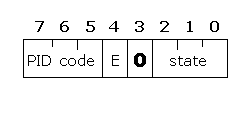
Two PID status bytes (bytes 26 and 27 of the logged data frame) are available for possible debugging. Byte 26 is for the Vs/Ip (or wideband) PID, and byte 27 is for the Heater PID. They take the general form shown at right (numbers 7 to 0 are the bit positions within each byte).
Bits 7 to 5 represents the PID code which takes the following values:
Bit 765 |
PID Operation |
|---|---|
000 |
operating normally |
001 |
Integral accumulator at lower clamp value |
010 |
Integral accumulator at upper clamp value |
011 |
Output control value at lower clamp |
100 |
Output control value at upper clamp |
Bit 4 (E) is set when the IPID error band is exceeded (but this in itself is not an error).
Bit 3 (0) is always zero.
Bits 2 to 0 reflect the current PID state and is different for each byte/PID. They are described in the following section.
| Value | Byte 26 -- Vs/Ip PID (wideband) State |
Red and Amber LED action |
|---|---|---|
0 |
null/off state, only seen at system start-up or during debugging |
slow, even RED flash, AMBER off |
1 |
Sense state, looking for presence of sensor. |
Even RED flash and very short AMBER flashes |
2 |
Cold state, heating up sensor, PIDs not yet operational |
Short RED flash, AMBER shows heater on time |
3 |
Warm state, PIDs operational |
RED solid ON = PIDs OK or, |
4 |
Config state, used for system testing |
Double RED flash. |
5 |
unused |
nil |
Note that the "blinking" LED in the operational state does not indicate that either of the PIDs are unlocked, per se, but that one of the PIDs is operating with its error term greater than a pre-programmed threshold value.
| Value | Byte 27 -- Heater PID State |
Red and Amber LED action |
|---|---|---|
0 |
Normal Operation state |
slow, even RED flash, AMBER shows heater on time |
1 |
Vbatt high |
Even RED flash and very short AMBER flashes |
2 |
Vbatt low |
Even RED flash and very short AMBER flashes |
3 |
Heater short |
|
4 |
Heater open circuit (sensor not present) |
|
5 |
FET failure |
|
6 |
unused |
nil |
K-type thermocouples can be used to measure exhaust gas temperatures. Thermocouples generate a voltage that depends on the difference between the "hot" junction where two dissimilar metals are joined, and the two "cold" junctions of each metal wire. Wideband models that have thermocouple inputs also have a thermistor to measure the actual temperature of the WB unit that is used for thermocouple "cold junction" compensation (CJC). This topic is described more fully here.
The original (Rev-2 PCB) 2A0 DIY kit version came without on-board logging, this section describes how to update those units. This section has moved (Jan 26 2004). Please refer to the WBo2 Logging Hardware page for more information.
For older 2A0 units that did not come with any on-board logging facility, see the 32 k byte Logger Hardware section for DIY details. Both older and new 2A0 models, as of September 2005, can be upgraded to 1 M byte of logging memory. Newer 2Y DIY models had a plug-in module that adds the 1 M byte logging capability.
 All Tech Edge's Wideband (WBo2) units include some form of serial (either RS232, USB, or CAN) logging capability.
Some include on-board logging memory for data collection without a PC
(
All Tech Edge's Wideband (WBo2) units include some form of serial (either RS232, USB, or CAN) logging capability.
Some include on-board logging memory for data collection without a PC
(
 On-Board Logging :
Although data is always pumped out the serial port(s), that data can also be stored in memory on-board many WBo2 units.
Logging to on-board memory (on-board logging)
is controlled by the logging button on the controller (shown at left for the 3A1 unit)
or the button on the display (shown at right for the LX1),
Logging
On-Board Logging :
Although data is always pumped out the serial port(s), that data can also be stored in memory on-board many WBo2 units.
Logging to on-board memory (on-board logging)
is controlled by the logging button on the controller (shown at left for the 3A1 unit)
or the button on the display (shown at right for the LX1),
Logging